
Getting started
Install
Section titled “Install”The easiest way to install and license VoxMark is the aescripts + aeplugins manager app. It puts the plugin in the right place for each version of Cinema 4D you have. To try VoxMark first, see the trial.
VoxMark runs in Cinema 4D 2024 to 2027, on Windows and macOS (Apple Silicon). Restart Cinema 4D after installing.
Open the panel
Section titled “Open the panel”Choose Extensions ▸ VoxMark C4D. If you use other Chroma plugins, VoxMark is also in the Chroma menu in the main menu bar.
The panel is an ordinary Cinema 4D window: dock it into your layout and it comes back with the layout. The first time you open it, VoxMark asks for your licence — see Licensing & support.
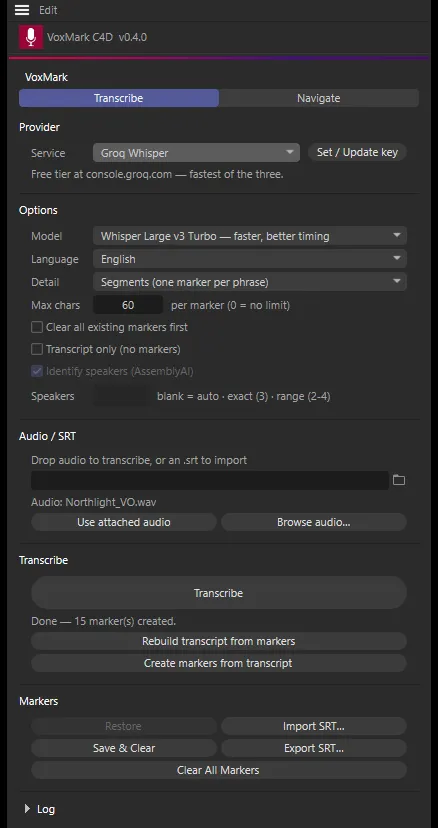
The panel has two tabs:
- Transcribe — choose a provider, set the options, bring in audio or an SRT, and create markers.
- Navigate — your transcript: jump, search, edit captions, manage voices and adjust timing.
A status line along the bottom says what just happened, and on the right counts the captions, markers, and any markers parked or saved.
The first time you open the Transcribe tab, a short welcome explains the three steps below.
Choose a provider and add your key
Section titled “Choose a provider and add your key”VoxMark sends your audio to a transcription service you choose, using your own API key. The key is stored on your computer and used only to talk to that service, which bills you directly.
- On the Transcribe tab, pick a Service. Groq is the default — it has a free tier.
- Click Set / Update key, paste your key and click Save. Get key… opens the provider’s key page in your browser.
The details are on Providers & API keys.
Your first markers
Section titled “Your first markers”- Bring in the audio. Drop your voiceover file onto the field under Audio / SRT, or click Browse audio…. VoxMark attaches it to the scene so it plays with the timeline — see the audio track.
- Check the Options — the defaults suit most voiceovers.
- Click Transcribe.
VoxMark trims any leading silence, uploads the audio, and lays a ranged, colour-coded marker on every phrase. When it finishes, the Navigate tab opens with your transcript.

Already have an SRT — from VoxMark for After Effects, say? Drop the .srt onto the same field
instead; it becomes markers and a transcript straight away, no key needed. See
SRT import & export.