
The Navigate tab
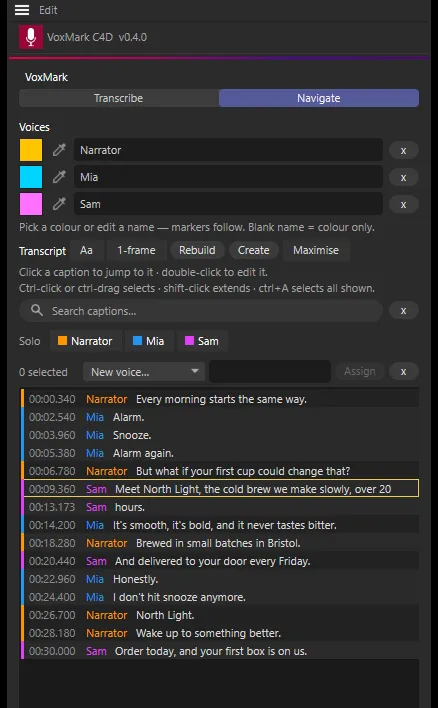
The Navigate tab shows your whole transcript, one caption per row: a voice-colour stripe, the time, the voice name and the text. It is saved in your scene, so it’s there whenever you come back.
With no transcript yet, the list says how to get one: transcribe or import an SRT on the Transcribe tab, or — if the markers are already on the timeline — use Rebuild.
Jump and follow
Section titled “Jump and follow”- Click a caption to move the playhead straight to it.
- As you play or scrub, the caption under the playhead is outlined.
- Frame the timeline on jump (under Timing tools, on by default) also scrolls the Timeline to the new time.
The transport
Section titled “The transport”|< Start, < Prev, Next > and End >| step the playhead to the start, the previous caption, the next caption and the end of the scene. While a search or solo is active they step through only the captions you can see. With no transcript they step through the markers on the timeline.
Search
Section titled “Search”Type in Search captions… to filter the list. The search is forgiving: it finds a phrase with missing or extra spaces, typos, words in a different order or missing, a word you’re still typing, and — for English — words that sound alike. A phrase split across two captions finds both. Matches are highlighted, and the count of captions shown appears on the right.
- Enter steps to the next match; Shift+Enter to the previous one.
- Esc, or x beside the field, clears the search.
Results stay in timeline order.
Edit a caption
Section titled “Edit a caption”Double-click a caption to correct it in a small text window, then click OK. The saved transcript updates straight away, and so does the caption’s marker on the timeline. A caption can’t be empty.
The voice name isn’t part of what you edit — it stays attached to the caption.
Selecting captions
Section titled “Selecting captions”- Ctrl-click (⌘-click on a Mac) adds or removes a caption.
- Ctrl-drag paints a selection across several — starting on a selected caption deselects instead.
- Shift-click extends from the last caption you clicked.
- Ctrl+A selects every caption shown.
Only captions you can see stay selected: change the search or solo and hidden captions drop out of the selection, so you never assign a voice to captions you can’t see.
Voices
Section titled “Voices”The Voices list above the transcript shows each voice with a colour swatch.
- Rename a voice by editing its name. Every marker for that voice follows, and the name flows into SRT exports.
- Change its colour with the swatch — its markers recolour.
- Remove a voice with x — its captions keep their text and just lose the voice.
- A voice can have no name at all, just a colour. A transcription without speakers leaves its captions with no voice; assign them one (below) to recolour them together.
Voice names can’t contain square brackets, and two voices can’t share a name.
Assigning voices by hand
Section titled “Assigning voices by hand”Works with any provider, no speaker detection needed:
- Select the captions (see above). The bar above the list shows how many are selected.
- Pick a voice from the menu — or choose New voice… and type a name — and click Assign. x clears the selection.
Assigning New voice… with no name gives the captions the unnamed, colour-only voice.
With two or more voices, a row of Solo chips appears under the search.
- Click a chip to solo that voice; click it again to un-solo.
- Ctrl-click adds a voice to the solo, or takes it out — like layer solo.
- Captions with no voice have their own No voice chip.
Soloing filters the list, and if the transcript has markers on the timeline, the other voices’ markers are parked: taken off the timeline and kept in the scene until you un-solo. A notice says how many are parked, with an Un-solo button. The footer counts them as parked.
While a solo has markers parked, actions that would rewrite the markers wholesale — transcribing, importing, rebuilding, creating, clearing, Save & Clear, Restore, the Aa / 1-frame toggles, removing a voice and the timing tools — are paused. The status line tells you to un-solo first. Export SRT still works and exports only the soloed voices — see SRT import & export.
Set preview range to caption
Section titled “Set preview range to caption”Select one or more captions and click Set preview range to caption. Cinema 4D’s preview range now spans exactly those captions, so you can play a single line without hunting for its edges. With nothing selected, it uses the caption under the playhead.
Cinema 4D doesn’t record the preview range in undo, so Ctrl+Z won’t put the old one back.
Maximise
Section titled “Maximise”Maximise in the Transcript header hides the voices, the marker buttons and the timing tools so the search, solo, list and transport fill the panel. Click it again, or press Esc, to restore. VoxMark remembers the choice.
The header buttons
Section titled “The header buttons”| Button | What it does |
|---|---|
| Aa | Hides the caption text on every marker in the timeline, to declutter it. Click again to bring it back. |
| 1-frame | Switches ranged markers to single-frame markers, and back. |
| Rebuild | Rebuilds the transcript from the markers on the timeline. Replaces the saved transcript. |
| Create | Creates markers from the saved transcript. |
| Maximise | See above. |
These are explained on Markers in Cinema 4D. The marker buttons — Restore, Import SRT, Save & Clear, Export SRT and Clear All Markers — appear on this tab too, and do the same as on the Transcribe tab.